Summary: in this tutorial, you’ll learn how to use the Flutter Expanded widget to expand the child widget of a Row or Column.
Introduction to the Flutter Expanded widget #
A flex layout e.g., a Row or Column arranges child widgets within its container and distributes the space between the children.
The following example uses a Row to arrange child widgets in a horizontal array:
import 'package:flutter/material.dart';

void main() {
  runApp(const MyApp());
}

class MyApp extends StatelessWidget {
  const MyApp({Key? key}) : super(key: key);

  @override
  Widget build(BuildContext context) {
    return MaterialApp(
      debugShowCheckedModeBanner: false,
      home: Scaffold(
        body: SafeArea(
          child: Row(
            mainAxisAlignment: MainAxisAlignment.spaceBetween,
            children: [
              Container(
                color: Colors.redAccent,
                height: 50,
                width: 50,
              ),
              Container(
                color: Colors.greenAccent,
                height: 50,
                width: 50,
              ),
              Container(
                color: Colors.blueAccent,
                height: 50,
                width: 50,
              ),
            ],
          ),
        ),
      ),
    );
  }
}Code language: Dart (dart)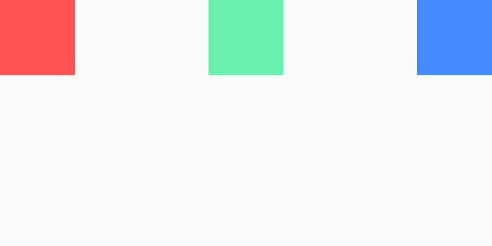
To expand a child widget to fill up all available space, you wrap the child widget within an Expanded widget.
Note that an Expanded widget must be a descendant of a flex container like a Row or Column.
For example, the following uses an Expanded widget to wrap the second child widget of a Row layout. In this case, the second child widget fills all available space on the main axis:
import 'package:flutter/material.dart';

void main() {
  runApp(const MyApp());
}

class MyApp extends StatelessWidget {
  const MyApp({Key? key}) : super(key: key);

  @override
  Widget build(BuildContext context) {
    return MaterialApp(
      debugShowCheckedModeBanner: false,
      home: Scaffold(
        body: SafeArea(
          child: Row(
            mainAxisAlignment: MainAxisAlignment.spaceBetween,
            children: [
              Container(
                color: Colors.redAccent,
                height: 50,
                width: 50,
              ),
              Expanded(
                child: Container(
                  color: Colors.greenAccent,
                  height: 50,
                  width: 50,
                ),
              ),
              Container(
                color: Colors.blueAccent,
                height: 50,
                width: 50,
              ),
            ],
          ),
        ),
      ),
    );
  }
}Code language: Dart (dart)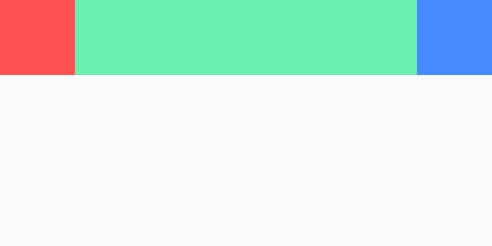
When you have multiple Expanded widgets, the container will distribute the space among them using the flex factor. For example:
import 'package:flutter/material.dart';

void main() {
  runApp(const MyApp());
}

class MyApp extends StatelessWidget {
  const MyApp({Key? key}) : super(key: key);

  @override
  Widget build(BuildContext context) {
    return MaterialApp(
      debugShowCheckedModeBanner: false,
      home: Scaffold(
        body: SafeArea(
          child: Row(
            mainAxisAlignment: MainAxisAlignment.spaceBetween,
            children: [
              Expanded(
                flex: 1,
                child: Container(
                  color: Colors.redAccent,
                  height: 50,
                  width: 50,
                ),
              ),
              Expanded(
                flex: 2,
                child: Container(
                  color: Colors.greenAccent,
                  height: 50,
                  width: 50,
                ),
              ),
              Container(
                color: Colors.blueAccent,
                height: 50,
                width: 50,
              ),
            ],
          ),
        ),
      ),
    );
  }
}Code language: Dart (dart)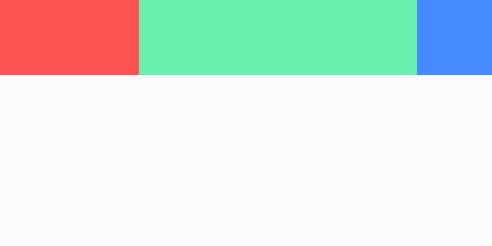
In this example, the second widget fills the space twice as big as the first widget’s because its flex factor is two times as big as the first widget’s.
Summary #
- Use an
Expandedwidget to wrap a child widget of a flex container to expand its size so that it fills the available space.